I haven't posted in a long time. Apologies all around. But I have a relatively good excuse set for all of my readers.
1. I've been busy creating some really cool electronics projects that I'm gonna release soon.
2. I've been busy cycling, and practicing Kung Fu.
3. I've been spending too many late nights at yo mom's house. OHH!
Anyway, here's some content:
I've been working a lot lately with the Atmega168 microcontroller. This, if you didn't already know, is the heart of the famous embedded control development platform Arduino.

The Atmega168 microcontroller.
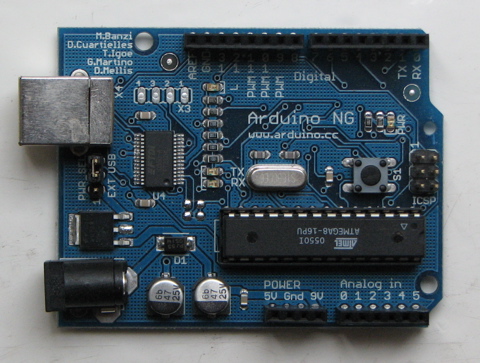
The World Famous Arduino Prototyping Platform.
This chip has the ability to run code from the user, and interface with a multitude of sensors, systems, and other components. Basically, with the right insight, someone could design almost anything to run from chips like these.
I've been using the Atmega168 for a while now as my go-to chip for embedded control applications in the field. It comes in a surface mount package as well as a through-hole DIP chip that allows for breadboarding and prototyping with standard perfboard circuitry. The Atmega168 makes a great embedded chip for devices as it is cheap (~$4 US), and consumes very little power. With the DIY embedded control movement focused around the Arduino in full swing, interested people everywhere are discovering how easily and quickly they can create full functional automated systems in just a number of hours.
However, the idea of putting an entire Arduino in a box forever is a little unnecessary, as the core functionality of this unit for a permanent application can be replaced with just the chip, and a power regulation circuit. The user-friendly nature of the Arduino has attracted many newcomers to feel comfortable with creating their first embedded control projects. However, if people realized that creating an embedded control system from scratch was as easy as it is, I think more people would use the chip by itself to create their own inexpensive inventions! All it takes is to power the chip properly and add a programming header. The chip can then be programmed in the circuit using this header and an AVR programmer. I use the AVR ISP MKII.

The AVR ISP (In Service Programmer) MKII. My weapon of choice for programming Atmegas.
This method of creating embedded control systems takes some of the mystery out of using Arduino libraries, as you can program the chip directly in C. I use AVR Studio to program my atmegas. There are plenty of tutorials out there for beginners. I highly recommend the Sparkfun Beginning Embedded Electronics Tutorials. With these tools and resources, you will find that with a little bit of perseverance you too can create awesome inventions!
Now, an embedded control circuit is only as good as what you interface it with. For some circuits, you may simply want to monitor some sensor and display the value. For this, it is relatively easy to integrate your computer with the microcontroller via serial communication. The sparkfun tutorials will guide you through this if you are interested. None of the computers I use have serial ports, so I use a Keyspan USB to Serial Adapter. The chip that runs the Keyspan device is the FTDI FT232RL Serial to USB chip, and Sparkfun also sells a barebones breakout of this chip that can interface directly to the microcontroller, allowing fast and cheap USB connectivity. For other circuits however, you may not want to have to have a computer interfacing with it whenever you want to get data from your system. For times like these, I have turned to a visual indication system via LCD readout. For the LCD, I have used the standard HD44780 or equivalent. These can be found on sparkfun, and are relatively cheap (~$15 US).

A 2 x 16 Character HD44780 equivalent LCD Display
I have used this combination of Atmega168 and HD44780 so often in fact, that I have recently put together a prototype for a board that does power regulation, pin routing, and LCD integration with the Atmega168. I call it The LCDuino, and I look to have this board for sale in the future if I get enough interest. The board comes with a row of holes at the bottom that can be soldered to. If a header is soldered into one of the rows, the unit can be pressed into a breadboard for rapid prototyping, and then soldered with flying wires for a more permanent installation.

The Electromagics LCDuino V1.0!

Back of the LCDuino!

LCDuino at Night!
This board will be released in more detail very soon on my website, including PCB layouts, Schematics, source code, and more photos. Solder one of these units up though, and you have a fully functional embedded control system with back lit LCD readout for under 20 dollars of components!
Alright, I'm out, but there's more to come soon!
oh baby!
ReplyDeleteThat's awesome! I love any invention that helps analog and digital be friends. So much potential...!
ReplyDelete